Learning To Make Delicate Paper Jewelry

Paper Jewelry: A Book Lovers Dream
Paper jewelry IS a book lover’s dream.
Am I right in making such a proclamation?
I’m probably reaching here.
But, as a book lover who also happens to be a jewelry designer, I wholeheartedly agree.
There’s something special about wearing a piece of jewelry created from words from some of your favorite books.
Jane Austen, Estella Gonzalez, Sandra Cisneros –I’d love to wear their beautiful words as a lovely piece of paper jewelry.
Having said that, I have yet to perfect the art of working with paper and transforming it into jewelry.
What better way to work towards perfection than to work on various projects? That’s precisely what we’ll do here.
In this post, I’ll share my adventures in creating:
- A paper brooch
- Paper hearts
- Three versions of paper heart earrings
- Paper flowers are also used to create a flower wall.

My love for beautiful words & paper jewelry
Is there anything better than reading a story that fills your heart with love and inspiration?
Words are powerful and beautiful.
My love for stories and creating jewelry is what has driven me to this post – an exploration of paper jewelry making.
Yes, I could easily purchase from an existing artist. I love & support various independent jewelry makers. (Jewelry's my thing!)
But like any crafty person out there, I want to get down and dirty and master a craft I’ve long admired.
Alright. Let’s do this.

Creating a unique paper brooch inspired by Dorothy Dandridge
“Art is the only way to run away without leaving home.”
Oh my goodness – am I excited to have worked AND FINISHED this project – finally.
While watching Bright Road, I was drawn to Dorothy’s sweet demeanor as Miss. Richards and her simple yet elegant wardrobe.
I noticed that she wore minimal jewelry, and while I think it wasn’t necessary, I think a piece like this would have complimented her character quite well.
*If you’d like to learn more about Dorothy Dandridge, I think you’ll love reading this post. It’s filled with beautiful vintage photos and details about her life.

Materials Used To Create Paper Brooch
-
4-inch Burlap Ribbon
- Cardboard
-
Triangle Seed Beads
- An old button
- Pages from an old Huckleberry Fin book
- Glue
- Tape
- Toothpicks
-
Pin Clasp

How I Made This Paper Brooch (VIDEO)
If you’re interested in watching me make this paper brooch, start watching the video above at the 4-minute mark.
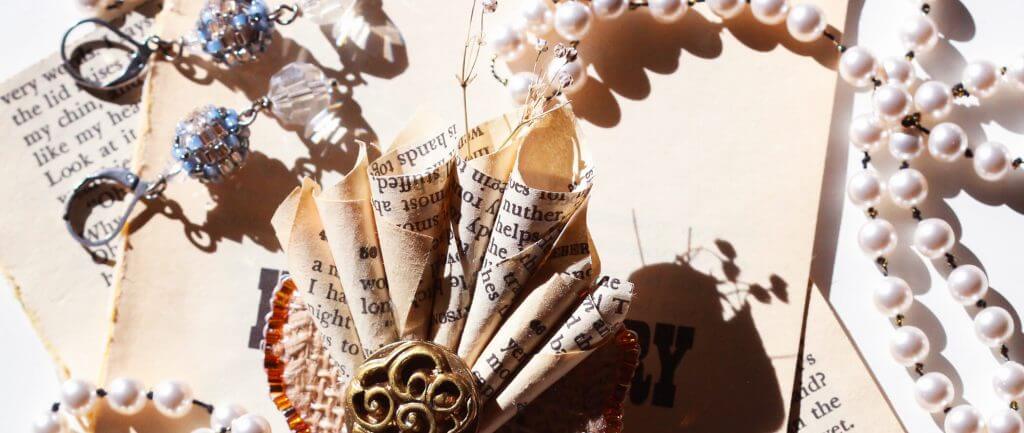
The final design of this paper brooch is a product of a lot of playing around with all my materials.
In short, this was my process:
1) CREATE PAPER CONES
To begin, I cut pages from an old Huckleberry Fin book into rectangles of varying sizes.
I used a toothpick to shape the pieces of paper into cones and a little bit of tape to hold the cones in place.
Because I knew I wanted to fan them out, I created more cones than needed and arranged them until I found a design that suited my needs.
2) CREATE YOUR FOUNDATION
I love using cardboard when creating pins because it’s easy to work with and because it’s a lightweight material.
The cardboard I’m using is as thick as the cardboard used for cereal boxes.
It’s part of a purchase I made years ago for $25 for a different project, and because it’s genuinely wonderful quality, I’ve used it on various projects since.
Given that we are covering it with the ribbon – LATER - I highly recommend that you do not invest in the cardboard I’m using here.
Instead, use something you might have at home.
3) GLUE THE PIN ON TO THE CARDBOARD FOUNDATION
Use a little bit of glue to attach the pin to the cardboard foundation.
LET IT DRY.
The time frame needed will vary depending on the glue you’re using.
Whichever adhesive you choose to use, make sure the pin feels securely set to the cardboard before working with it.
If it wiggles a little, it is not ready.
If you take the chance and work with it anyway, you’ll end up with a pin that could easily fall apart, and all your hard work will be for not.
4) CUT ENOUGH RIBBON TO FOLD OVER THE FOUNDATION
Use a little bit of glue and a toothpick to spread the glue around both sides of the cardboard.
Work on one side at a time while attaching the burlap ribbon because your adhesive may dry out too fast.
When working with the side with the pin attached to it, make tiny vertical cuts in the burlap ribbon that are small enough to fit the pin’s closure.
Once you fit the pin closure through, add a little glue to the pin and the surrounding area to ensure the burlap ribbon stays in place.
Again – let it dry.
Try to find something to weigh down the burlap ribbon while it dries, likely for at least 2 hours.

5) EMBROIDER THE EDGES WITH BEADS
Once the glue dries and the ribbon feels firmly in place, start beading the edge of the opening with triangle beads.
This step will give your brooch a lovely finish and ensure that it stands the test of time, as most adhesives tend to deteriorate over time.
To learn more about beading edges, I highly recommend the book Beading with Cabochons: Simple Techniques for Beautiful Jewelry (Lark Jewelry Books).
This book covers various methods for beading edges when working on cabochons.

6) ATTACH BUTTON ACCENT
Because you’re using burlap, you’ll find that it’s quite easy to sew your button onto your project.
For added security, I also recommend adding glue to the edges of the button shank and letting it dry before working with it, once again.
7) CAREFULLY GLUE PAPER CONES
Finally, arrange your paper cones in your desired design and glue them onto the burlap ribbon.
Let your project rest for at least a day before wearing it. This should help cement your work and increase its durability.
That’s it! 7 simple steps that result in a gorgeous timeless paper brooch.
Penny for your thoughts?


Creating 3 Darling Paper Earrings Designs Inspired by Selena Quintanilla
For these projects, I took inspiration from the heart-dangle earrings Selena Quintanilla wore to the Tejano Music Awards.
I love how vibrant and bold they are.
Somehow, I got it in my head that heart-shaped earrings made of paper would work best for this series…truly, I hope I’m right...
While I had the vision, I wasn’t sure where to start, so I played around with the materials I had until I felt comfortable with them.
In the process, I made three solid designs.
As with any new endeavor, I experienced quite a few growing pains.
These proved detrimental to these projects, but they reinforced valuable lessons I’d previously learned yet somehow overlooked or simply forgot.
I’ve noted them below. Hopefully, going forward, I’ll never forget & they’ll be of use to you if you give this project a try.
*P.S. I highly recommend reading my blog on Selena Quintanilla. It’s full of beautiful images, a book review, and more. Click here to read my blog: Selena Quintanilla, Continuing To Inspire The World.
The Basic Steps For Creating Paper Hearts
- Cut out hearts from cardboard
- Cut tiny strips of paper from pages of an old book – I used a paper cutter, and I think these strips are about .25 inches thick.
- **P.S. Cutting paper into thin paper strips using a paper cutter becomes increasingly tricky the smaller they get. Be careful.
- Dip each strip of paper in paper hardener/adhesive (I used Vibrance, Paper Bead Glaze for this project – not sponsored)
- Wrap paper strips around heart cutouts.
- Let wrapped cutouts dry out on a flat surface face up.
Upon completing this final step, your paper beads are ready for you to design your paper jewelry.

Design #1 - Simple Paper Heart Stud Earrings
When creating these dainty little studs, begin by cutting out dainty little hearts from cardboard.
Note that your final paper jewelry design will be bigger than the cutout – still, you don’t want to make these cutouts too small.
Then, dip each strip of paper in your adhesive/paper hardener solution and wrap them around your hearts.
Try to mix up the direction of your wrapping as often as possible to evenly distribute each strip of paper.
Please note that the smaller the heart, the more subtle your earrings will be, BUT they’ll still end up slightly bigger than your initial cutout.
Unfortunately, while initially I wanted dainty little hearts, these weren’t quite right.
They’re too small.
They’re cute, but they’re not what I intended.
From afar, you can scarcely make out the shape of the hearts.
Once the hearts dried completely, I glued the earring post directly onto the paper hearts. This, too, proved to be a big mistake.


Growing Pain - Lesson Learned & Things To Consider Next Time
It might have been that my paper hearts still weren’t fully dry, or that the glue used to attach the earring post hadn’t settled, but when I went to put them on just to see how they looked, my earrings basically fell apart.
Upon taking them off, the earring post detached from the paper heart along with a piece of the heart.
It might have been my impatience, the glue used to attach the earring posts, or the paper hardener solution not being dry that led to this inevitable result.
In the future, I’ll try one of 3 solutions.
- I’ll try attaching the earring posts to the cardboard foundation first. I’ll let it dry for 24 to 48 hours. Then, I’ll wrap each with the strips of paper.
- I’ll try a different hardening solution to ensure their durability.
- I’ll attach an additional backing after wrapping each with paper strips to serve as a foundation for the earring post. Doing so would hopefully prolong the earrings' lifespan and reduce my heartache.

Design #2 - Dazzling Paper Heart Stud Earrings
Given my disappointment with how subtle my paper heart studs turned out, I went with bigger heart cutouts as a foundation for this version of my paper heart earrings project.
Once again, I attached paper strips to the paper cutout with a hardening solution.
I let them dry and again glued the earring posts directly onto each heart.
Having learned from my mistakes from the first design, I added faux suede to the back of the earring posts and hearts, providing an added reinforcement layer.
Sandwiching the earring post between the paper heart and the faux suede provided kept the earring posts from easily detaching.
Around the perimeter of the heart, I used Swarovski Crystals bicone beads for a bit of shine and interest.
To the bottom points of each heart, I added a bit of delicate chain, which is all basically sewn into the embroidery.
Again, if you’d like to learn more about beaded embroidery, I highly recommend this book: Beading with Cabochons: Simple Techniques for Beautiful Jewelry (Lark Jewelry Books).
This is not an affiliate link; it’s just the book I used to learn about bead embroidery and one I often reference.


Growing Pain - Lesson Learned & Things To Consider Next Time
As I’ve already noted, I did add a bit of foundation to these earrings to prevent the earring post from detaching from the earring.
HOWEVER – I found that you need two layers of foundation.
- First, the foundation used to embroider around your focal bead
- Second, a foundation layer to hide any stitches from your bead embroidery.

I thought I could get away by not taking this step because the stitches were so tiny, and the foundation and the string matched perfectly, but in the end, it looked off.
Taking this step, an essential step in bead embroidery, would’ve made this a perfect design – in my eyes.
Instead, I feel as if I’m showing off my undercarriage in the most unflattering way…yes. I’m embarrassed.

Design #3 - Dangle Paper Heart Earrings
For this third design, I wanted to create something simple and fun; hence, after letting the paper hardener dry, I simply poked a few holes with a toothpick – one on the cupid bow and three holes evenly distributed along the bottom of the heart.


To finish the design, I added earring hooks to the top holes, a delicate chain to each of the bottom holes, and to the bottoms of each strand of chain, I delicately added a glass heart bead, which makes the overall design especially fun.
This is my favorite design of the three.


Creating A Flower Backdrop Inspired By An Iconic Photo of Selena Quintanilla (VIDEO)
“All I need to do is try and do the best that I can do.”
I’ve always loved the image of Selena with a flower backdrop.
She appears so happy and beautiful.
The roses in the background are just a lovely accent.
With this image in mind, I set out to create my own version of a flower background.
It’s not quite as seamless or vibrant as the original photo, but it’s still quite lovely – if I do say so myself.
For this project, I used a kit by Sterling Innovations – Beautiful Paper Flowers: Elegant – And Easy To Make – Blooms.
The kit includes everything needed to do the project:
- 24 sheets of crepe paper in different colors
- Floral wire
- Floral tape
- 24 stamens
- Beautiful Paper Flowers, a 64-page project book


I found the book’s step-by-step instructions very helpful and easy to follow, and completely worth the price.
I purchased this kit in 2016 for under $10.
Too busy to take the time to sit down to work through the kit before now. It’s just sat within my collection of crafting supplies.
Too enamored with the idea of creating paper flowers one day, I never had the heart to throw it out before trying it.
Pros:
- EVERYTHING you need is included.
- The book is wonderfully illustrated and written.
Con:
- The floral tape was challenging to work with.
- Once I finished with this project, I felt as if my fingers were going to get blisters.
- There’s a lot of wasted space in the box.
If you’re interested in purchasing your own kit, you may be able to find it in the following outlets:
This was my first go at both making paper flowers and creating a flower backdrop.
The fact that my paper flowers don’t look like they’re something from an episode of Nailed It!, is a testament to the wonderful instructions within the book.
With that said, if you do take the time to browse around for a kit of your own, you’ll find that its price varies quite a lot.

Conclusion
I hope you enjoyed my paper jewelry creations and findings.
One day, I hope to release a collection featuring paper beads that I can be proud of.
Until then, I hope to continue learning and adding to this post as I learn and grow in my skill set.
If you have any questions, please contact me via email lovealways@kaleidoscopesandpolkadots.com or via a direct message on Facebook or Instagram.
Also, consider joining my Facebook Group to share your thoughts:

Jessica Gonzalez Gibson
Leading Lady of Kaleidoscopes And Polka Dots
History & fashion enthusiast - I love exploring how fashion and history interconnect across the world.

